
[ A guest post by Chris Canto – senior software engineer for FlashSystem ]
The recent releases of Storage Virtualize have continued to deliver big enhancements for replication and it can sometimes be easy to overlook some of the smaller updates. With that in mind, I thought it might be helpful to share a couple of examples:
- Performing a planned failover with no data loss
- Performing a disaster recovery test without stopping replication
Chris Bulmer has previously shared some great posts introducing async policy-based replication and the migration path from Global Mirror. If you’ve not yet started with policy-based replication, those would be a great place to begin.
If you’re already familiar with using policy-based replication for disaster recovery, read on.
Planned failover with no data loss
The 8.6.2 release added support for policy-based replication using VMware Virtual Volumes (vVols). Note-to-self: that’s probably a good topic for another blog post! As part of that work, we provided an API to enable external orchestration to perform a planned failover, sometimes referred to as a planned migration, to a recovery copy with no data loss. The key part here of course is knowing when the recovery copy contains all the data from a particular point in time on the production copy. In policy-based replication, we refer to this as a “checkpoint” for the volume group, rather than saying a “sync”. This is a conscious choice to avoid confusion with synchronous replication, as that’s not what this workflow uses. Replication continues as normal during and after the checkpoint request; it’s always async replication. And because the replication itself isn’t changing, there’s nothing extra to do after the checkpoint is completed, or if you change your mind and decide you no longer need it.
The checkpoint provides a simple “yes/no” way to tell when the data from the production copy at the time you issued the last checkpoint has been copied to the recovery copy. When a checkpoint has been achieved, you can be certain that the data on the recovery copy is no earlier than the time the last checkpoint was requested.
Of course, you could already do a similar thing without a checkpoint, by knowing when the last update was made to the production copy and then monitoring the recovery point. But why do this yourself if the system can do it for you?!
Today, this functionality is only available using the CLI and REST interfaces as the first use case in mind was automation, but it’s something that could be added to the GUI if the interest is there. As a reminder, the IBM Ideas portal is the best place to submit suggestions for enhancements like this and vote on the suggestions from others: https://ideas.ibm.com
The checkpoint interface is simple:
- A command that can be issued on either system to initiate a checkpoint: ‘chvolumegroupreplication -checkpoint <volumegroup>’
- A view that indicates whether the last requested checkpoint on that system has been completed: the ‘checkpoint_achieved’ field in the lsvolumegroupreplication view.
Because the task can be issued on either system, you can use this in workflows that require the call to be made on the production copy or the recovery copy of the volume group. The checkpoint_achieved value reflects checkpoint requests made on the local system only, so you only need to view the status on the same system you issued the task on.
If the link between the systems goes down while a checkpoint is being processed, the system will automatically continue to complete that checkpoint when connectivity is restored. Similarly, you can even request a new checkpoint while a system is unavailable and the task will behave in just the same way. This means there’s no complicated error handling to think about when using this API as part of a bigger workflow.
When chatting with users about this, one visualisation was the replication being a river flowing between the two systems, with the recovery copy located a couple of miles downstream. Initiating a checkpoint is like launching a little boat onto the river. While the boat is on it’s journey, the checkpoint achieved reports “no”. Once the boat has reached the other system, the checkpoint is achieved and the CLI reflects that with “yes”. Just like the water continues to flow after the boat arrives, replication continues running, so the recovery copy will continue to be updated.
An example workflow for a planned failover might look something like:
- Quiesce I/O to the production volumes on the first site, for example, this might be shutting down the applications and hosts using the volume group.
- Initiate a checkpoint.
- Wait for the view to show the checkpoint has been completed.
- Enable access to the recovery copy on the second site.
- Bring up the hosts and applications on the second site.
One thing to keep in mind is that the volumes in the recovery copy of a volume group cannot be used for host I/O during normal running. However, you can map hosts to volumes in this state. This allows you to prepare the hosts at the recovery site ahead of time to verify things like host connectivity and multipathing. The hosts can discover the volumes (offline at this point), but can’t access the data on the volumes, just like the regular offline volume behaviour.
Performing a disaster recovery test without stopping replication
In the 8.6.2.0 release, we also introduced a way to access the recovery copy of a volume group for testing, without stopping replication. This allows a disaster recovery test to be performed without significantly increasing the recovery point while the test is in progress.
As mentioned above, during normal running, the volumes in the recovery copy are offline for host access, so the picture looks like this:

Starting a recovery test makes the volumes accessible, bringing them online for host access, so the picture now looks like this:
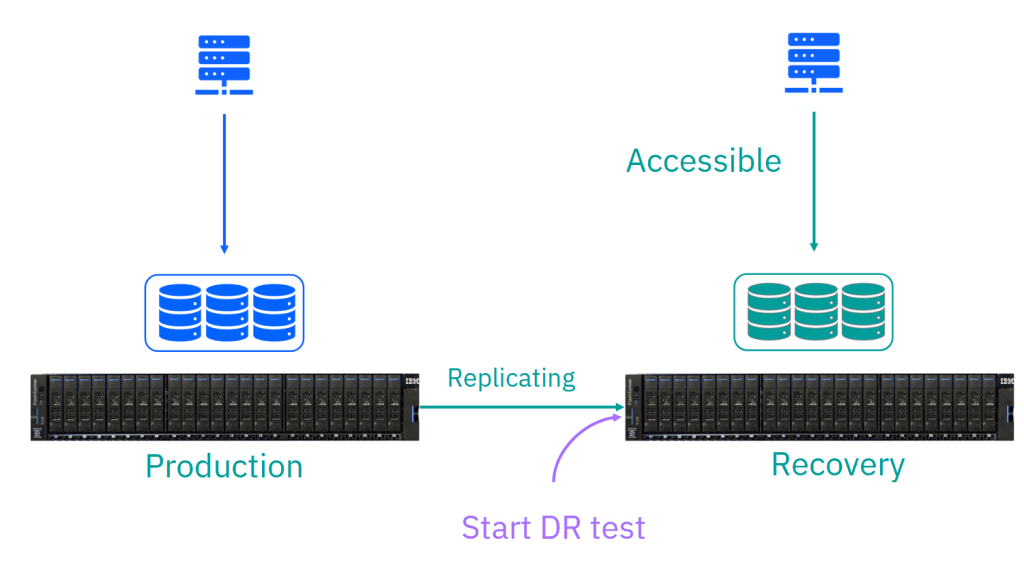
The hosts have access to a point-in-time copy of the recovery volumes, just as they would see if this were a real disaster and you were enabling access for a failover to the recovery site. These are the same volumes, i.e. they have the UUIDs and the same host mappings, that would be used if you were enabling independent access to the recovery copy in a real disaster. The difference here compared to a failover is that the replication is still running, but it’s not changing the data on the volumes as seen by the host. This means that when you come to stop the test, the recovery copy can be updated to the new recovery point very quickly.
The solution is simple to use:
- Start a recovery test by issuing ‘chvolumegroupreplication -startrecoverytest <volumegroup>’ on the system with the recovery copy.
- This enables read/write access to the volumes in the volume group, making the latest recovery point temporarily accessible for host access.
- As you’d expect, the production copy of the volume group remains accessible throughout the test; it’s “business as usual” there.
- Test your disaster recovery plan.
- You can bring up hosts on the recovery site, for example, to validate any application dependencies that might exist in your environment are handled correctly before an actual disaster or planned migration.
- You can’t create or delete volumes on the test copy, but these operations are still supported on the production copy of the replication group, and any changes made to the production copy while the test is active will be replicated to the recovery copy when the test is stopped.
- Stop the recovery test by issuing ‘chvolumegroupreplication -stoprecoverytest <volumegroup>’
- When the test is stopped, any changes that were made to the recovery copy during the test are discarded.
Again, this functionality is currently only available using the CLI and REST interfaces, but the GUI will show if a test is in progress.
What happens if a real disaster happens while I’m in the middle of a test?
In the event of a disaster, you can enable independent access to the volume group just as you usually would. The in-test copy of the volume group remains accessible, allowing you to promote the test copy directly to production.
Additionally, you could take a snapshot of the volume group before starting a disaster recovery test if you’d like to keep a particular known point-in-time copy available for use in the event of a real disaster.
What if my disaster recovery test doesn’t go to plan?
Not a problem. After all, the whole point of testing the disaster recovery plan is to be able to validate the plan works. Rather than keeping the test active while you get to the bottom of things, you can take a snapshot of the volume group before stopping the test. This snapshot will be taken from the test image, allowing you to create a clone and mount the new volumes to a host to continue analysis after the test has finished.
These functions are now available in the 8.7.0 long-term support (LTS) release, along with several other enhancements for policy-based replication and policy-based high availability. As always, you can refer to the release notes or the product documentation to see the list of new features in the release.

Now we’ve caught up on those items, it must be almost time for the next big update.


Leave a comment