
In Part1 we saw how partitions form the basic building blocks of PBHA, how to create and manage partitions, some considerations for “getting it right” on day1 and how to make the partition and its objects into a Highly Available Partition.
In Part2 we looked at the different types of HA deployment that are possible, from full HA, to HA storage and to DR like HA – including different host access modes, such as uniform and non-uniform.
In these final part(s) we look at how each of the types defined in Part2 handle different failure scenarios.
- Part 3a discussed failure scenarios for fully Active/Active configurations
- Part 3b here, covers Active/Passive configurations, and is a long read I’m afraid!
[I had originally planned to cover all deployment types here, but the post was too long, Part3 will be in itself 3a,b,c]
Legend :

Part3b – Comparing Availability – Active/Passive Hosts
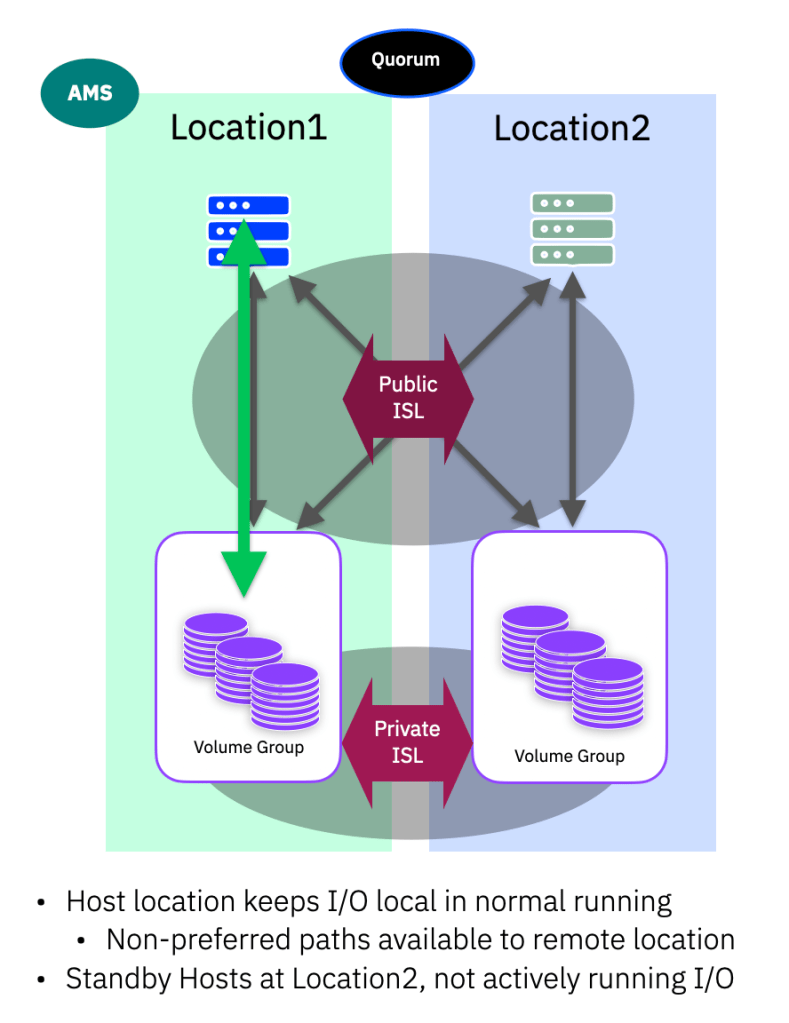
Normal Running
The main difference between the Active/Active and Active/Passive configuration is that an application, or OS is not cluster aware. That is, the application in general only runs at one location. This location should be aligned with the AMS and the cross-site public-ISL links are not used in normal running. All I/O stays local to the AMS site.
Note: The location is actually the name of each respective system. Where previous HA solutions were really “split or stretched clusters/systems”, now that PBHA uses independent systems that are partnered rather than clustered, we don’t need a generic site1, site2 definition as the name of the system implies the location/site.
Reads and writes are simple, always arriving at the AMS storage system, and as normal the storage takes care of mirroring the write updates via the private-ISL zoning/vSAN configuraton.
The hosts at location2 are in a standby mode, i.e. the can see the storage at both locations, but no active workloads are running on those hosts in normal running.
Pathing, in terms of optimised/non-optimised (preferred/non-preferred) follows the usual AMS preferred rules. So all paths to the storage at the AMS from hosts marked in the AMS location will be preferred over the cross-ISL paths.
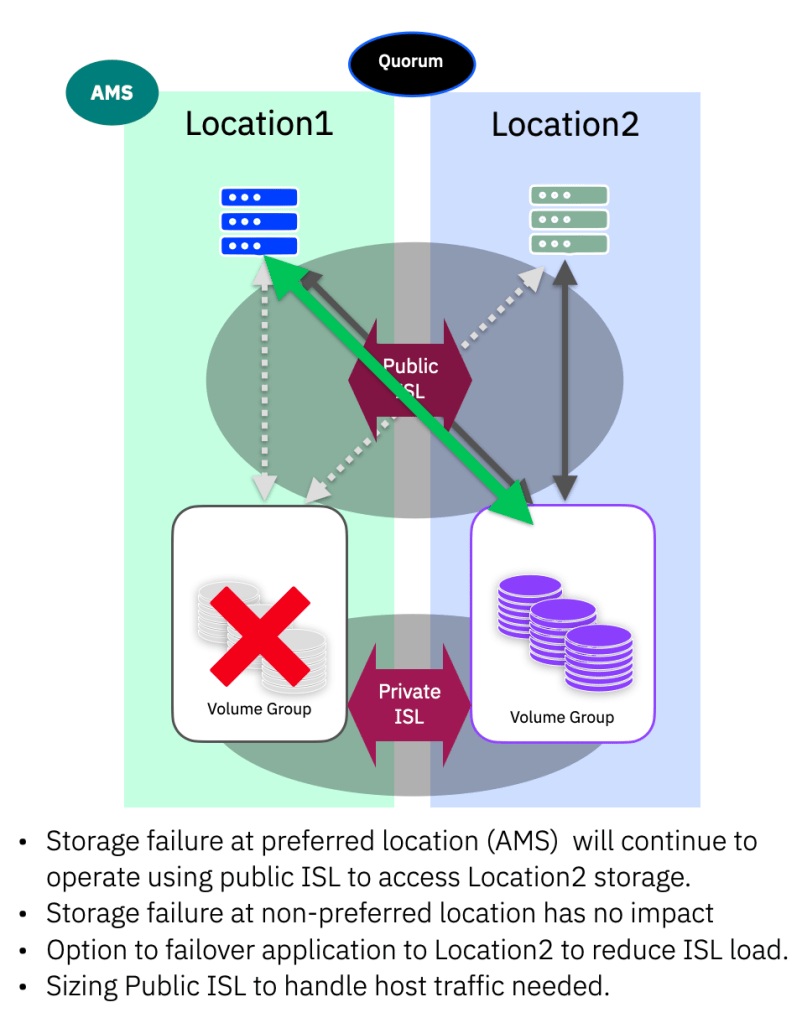
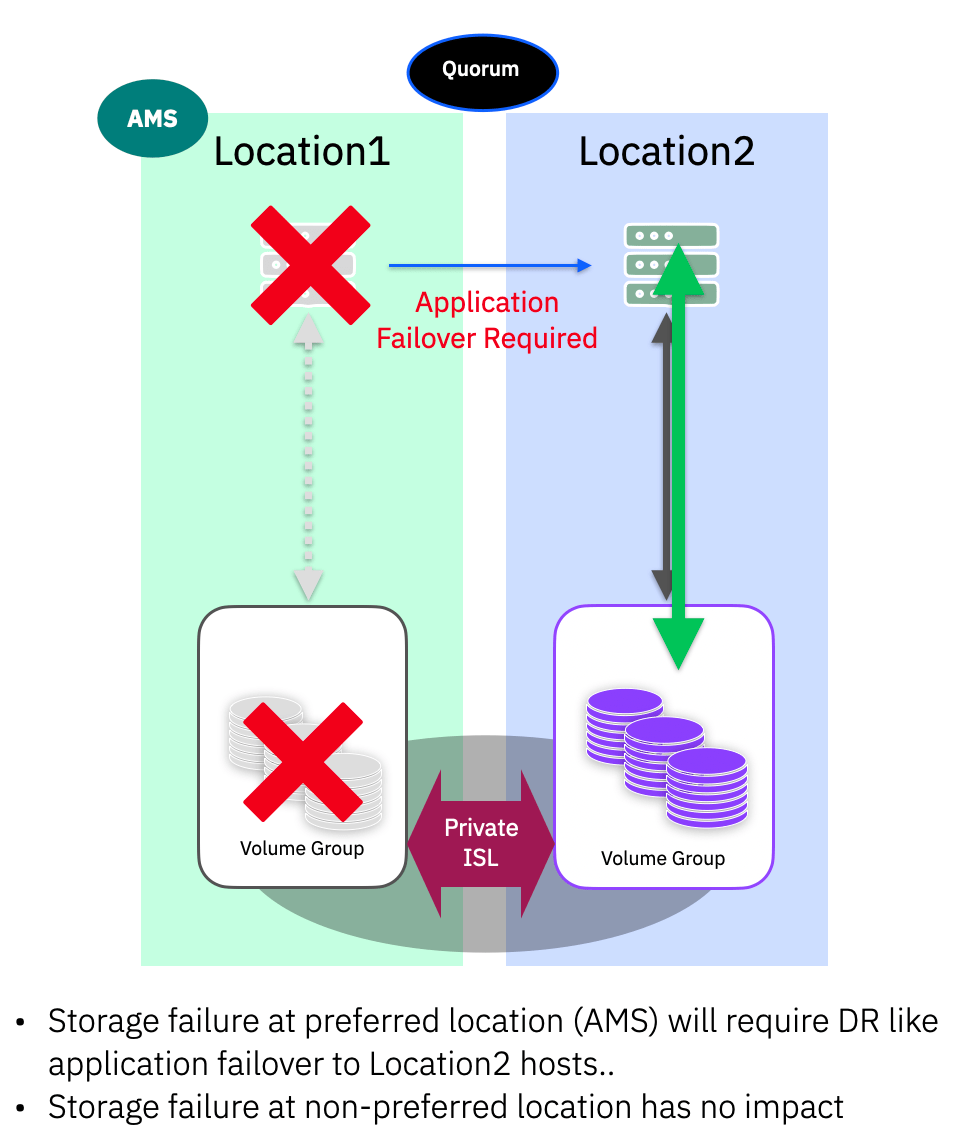
Storage Failure
In the case of a storage failure, this could be the system as a whole (power issue for example) or multiple-drive failures that cause a pool to go offline, the host at the same location will lose its optimised paths. As we have uniform host configurations, the host multi-pathing simply starts using the non-optimised paths. No user intervention is required for I/O to continue at the AMS location.
Depending on the Public-ISL bandwidth and the distances involved, some impact to latency should be expected – simply a matter of the speed of light! If this causes a problem, the user can move the application from location1 to location2 and at the same time switch the AMS location to ensure correct site level failure if the ISL links are lost in addition to the storage system.
When the storage issue is resolved, the system will automatically return to full redundancy and the multi-pathing will revert to using the optimised paths.
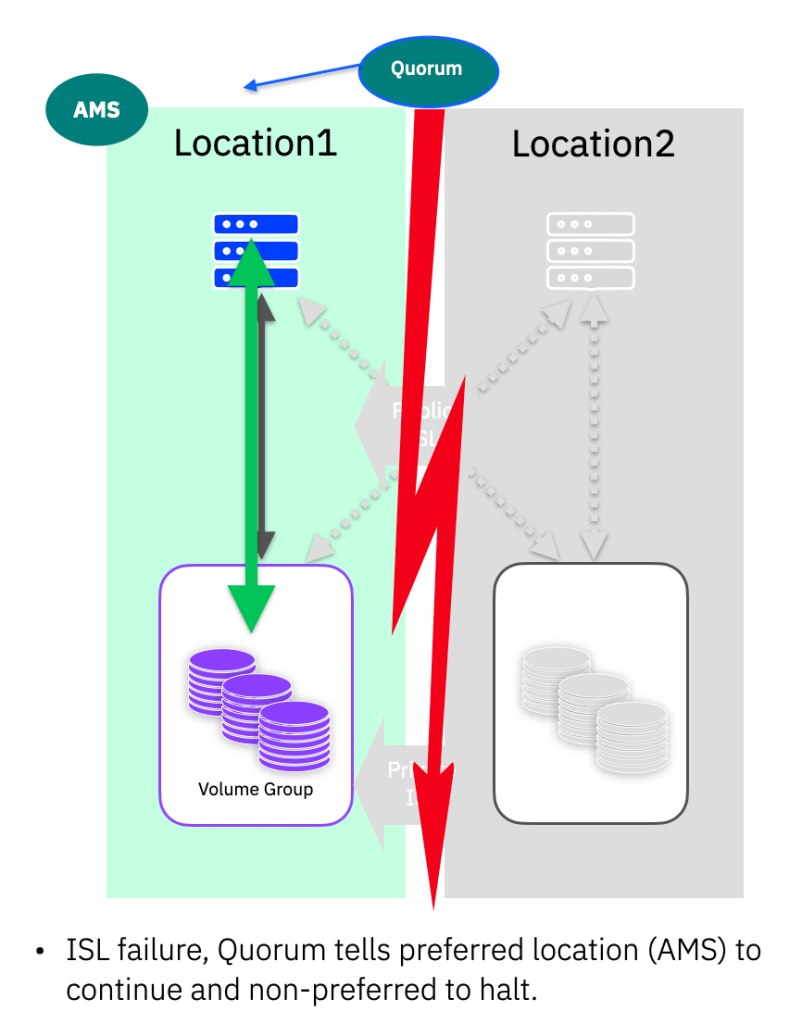
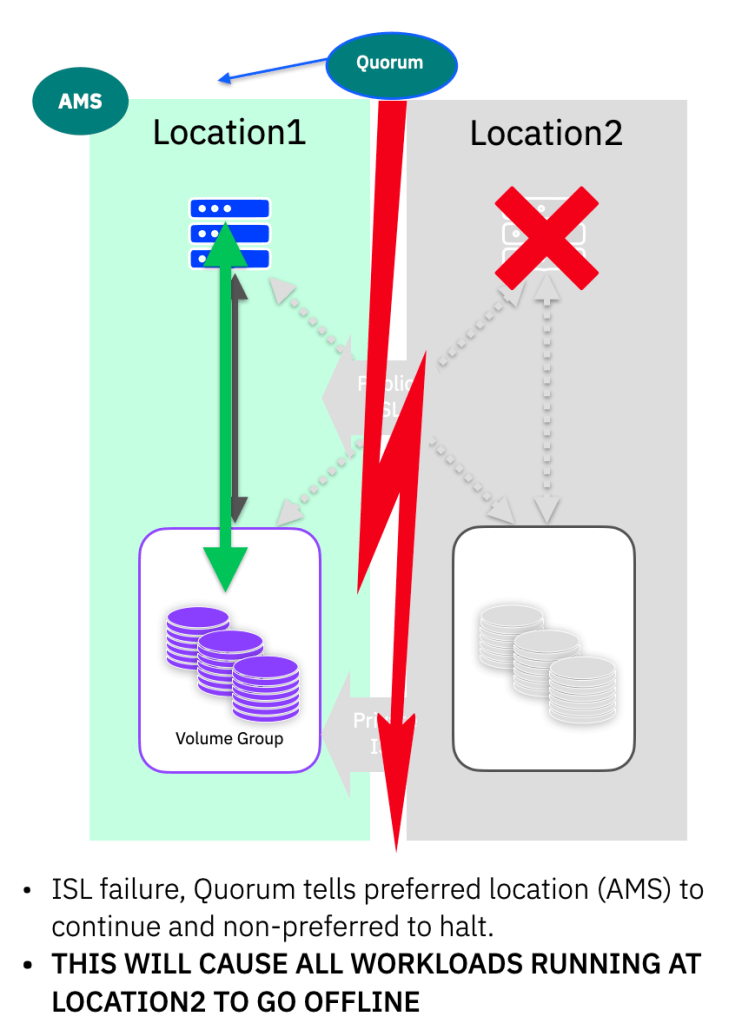
ISL Failure / Split brain
If the two storage systems lose contact with each other, then the IP Quorum is used to validate that both systems are still online. The AMS will be instructed to continue and the other system will take the paths to the volumes in the partition offline. Quorum is assessed on a per HA-partition pair basis, always following which location is the AMS for a given pair. (Unless of course one of the storage systems has of course failed – in that case the remaining system will continue as described in the previous section)
This is the reason it is imperative to ensure the AMS is allocated to the same location as where you are running the applications using volumes in this partition. If you get this wrong, the AMS (assuming it is available) will always win the quorum tie-break, then you could lose access if the application is actually running at the non-AMS location.
Active/Passive – with simultaneous asymmetric load-balancing workloads.
It is common in the active/passive setup to see the “passive” location as a potential untapped resource. That is, you want to make use of the servers and storage capability at the non-AMS location.
This makes sense, and is a fully supported configuration – HOWEVER…. TAKE NOTE BELOW!!!
Looking at what happens under normal running and under a single storage system failure, all is good :
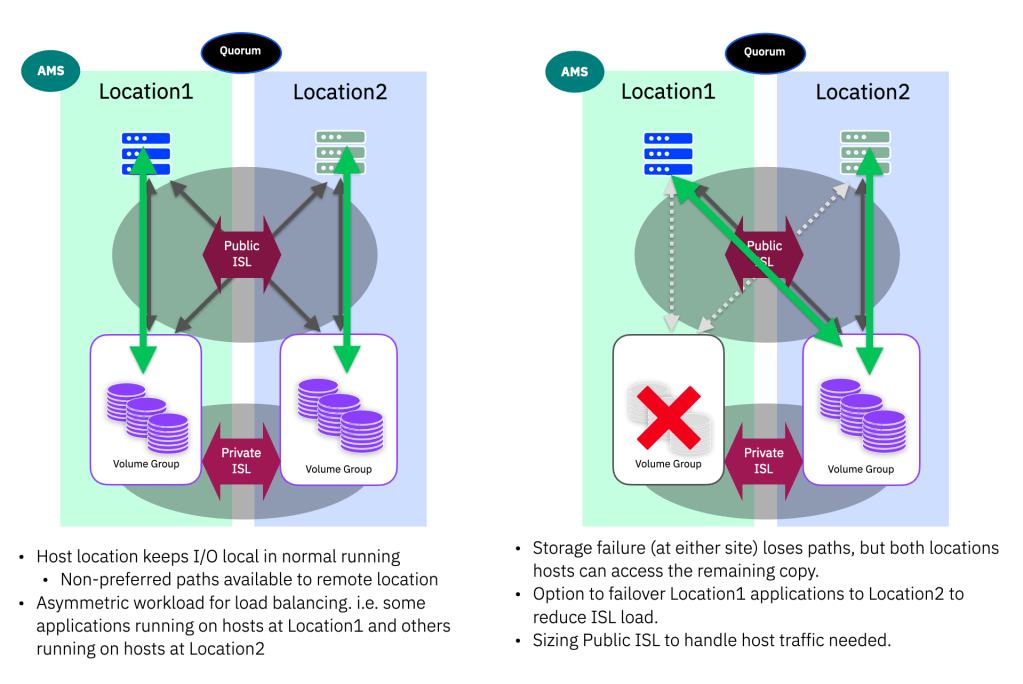
In normal running, each location does its own work and we have writes being mirrored across the private-ISL in both directions as expected. Reads all stay local and we are happy as we are making use of both sets of hosts, and storage in a load-balanced manner.
Even if we have the storage system failure at one location, the non-preferred pathing kicks in and we are still all running without interruption…
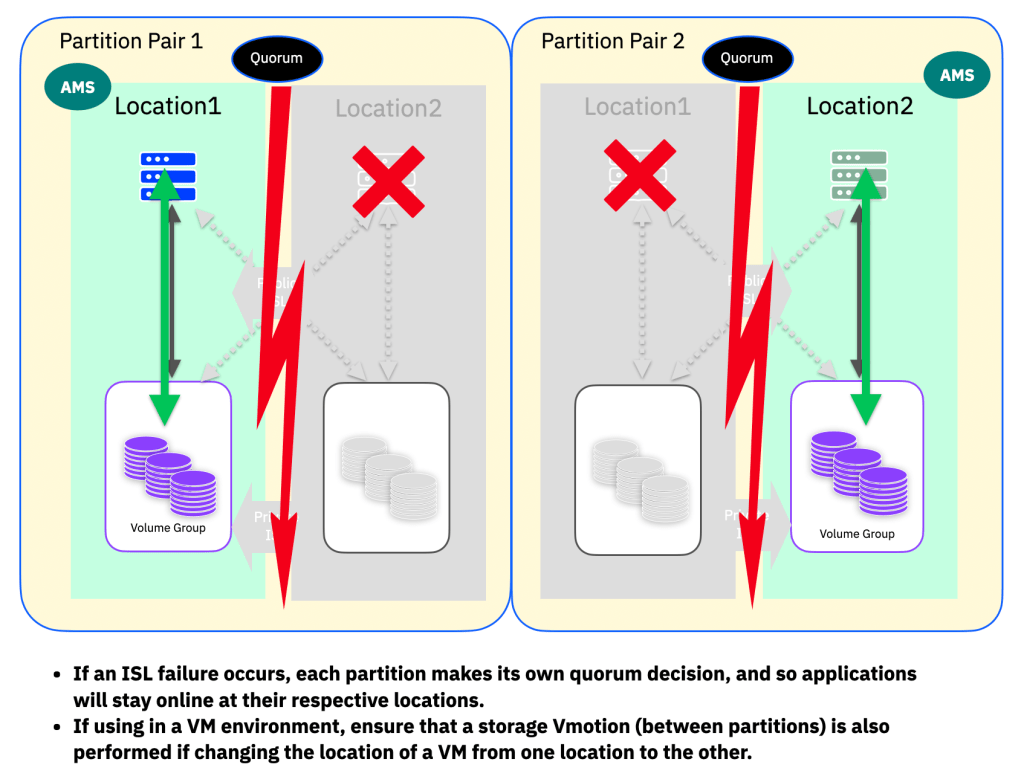
HOWEVER… imagine what happens when we have a split-brain quorum tie-break… THE AMS LOCATION IS THE ONLY ONE THAT STAYS ONLINE…
Recommended configuration for Active/Passive with load-balanced workloads running at each location
All is not lost however, it is possible to configure this in such a way that means no workloads go offline in the event of a split-brain tie break decision…. it requires two pairs of partitions, where each pair has the AMS aligned to each respective location.
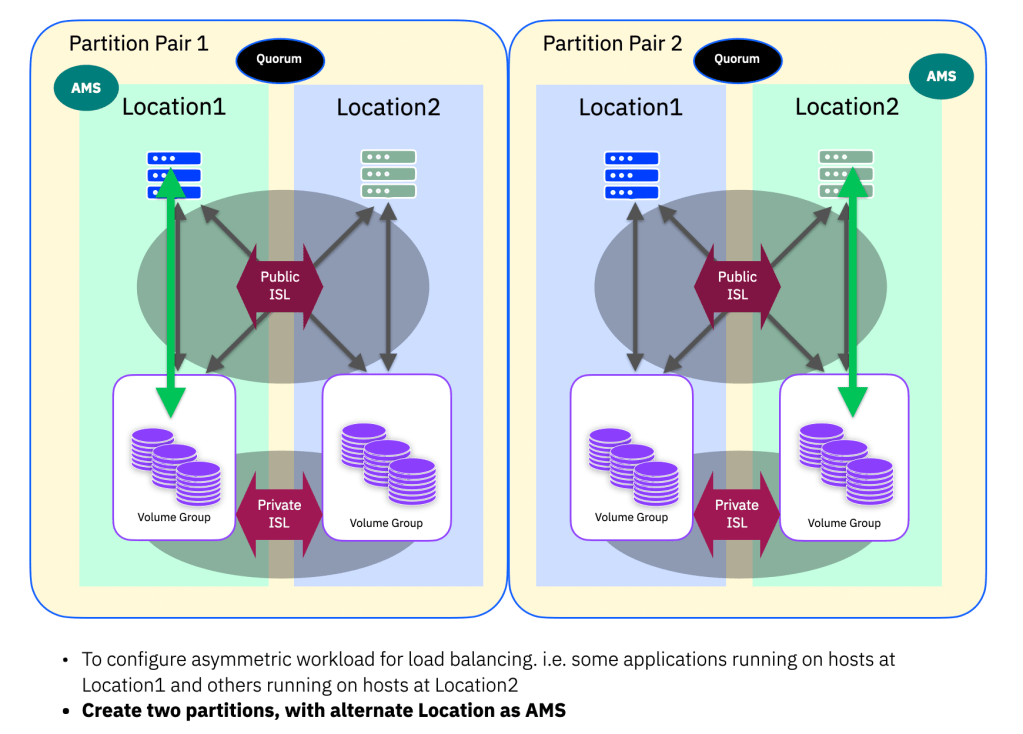
Because the quorum tie-break decision is made on a per-partition basis, by defining the AMS at different locations, we tell the system which location should continue for a given workload. In the event of a split-brain scenario, we then end up with each of these sets of workloads continuing to operate at their chosen location :
Part 3b Summary
Now you can see why I split part3 into smaller chunks!
In this part we have specifically discussed Active/Passive configurations and clarified that if you want to make full use of hardware resources at each location you need to align workloads, hosts, and the AMS-partition definitions to ensure smooth running in the event of an ISL failure that causes a quorum tie-break decision.
The huge benefit we get with PBHA (when compared to HyperSwap) is that in a single setup (HA pair of systems) we can allow different quorum decisions based on the partition definitions themselves and no hardware is taken offline when quorum tie-break decisions are made.
Part 3c will look at the final DR like set of configurations and how they behave under common failure scenarios.


Leave a comment